Installation de nitropy sous Windows
Note
En général, le support Windows et l’installateur sont expérimentaux - veuillez les utiliser avec prudence.
Note
Si vous utilisez déjà Python sur votre système et êtes familier avec l’invite de commande, vous pouvez alternativement installer nitropy avec pipx, voir Installer nitropy avec pipx.
Using our Release
Téléchargez le dernier
.exefichier de releases.Ouvrez la console de commande en mode administrateur (Windows 10 : appuyez sur le bouton droit de la souris dans le menu Démarrer et sélectionnez « Windows PowerShell (Admin) » ; dans le menu).
Change to the directory of the
.exe(something likecd C:\Users\YOURUSER\Downloads)Exécuter
nitropy-VERSION.exe
Note
If you’re using Microsoft Edge, the downloaded
.exemight be marked as « untrusted » by Windows. To mark it as trusted anyway, click the three dot on the right of the warning, then « keep », then « show more » and finally « keep anyway ».
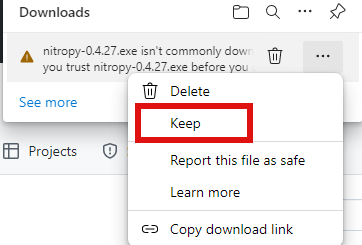
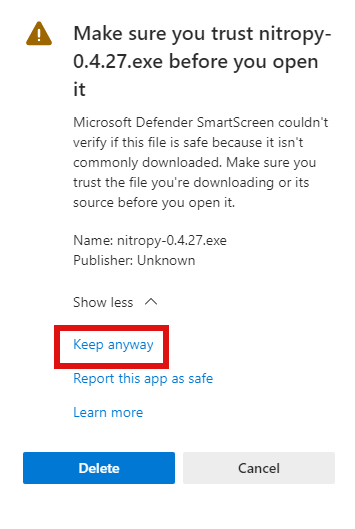
Note
Sans les privilèges d’administrateur, il se peut que nitropy ne puisse pas communiquer avec l’appareil.
Using WinGet
If you don’t have WinGet installed on your system you can download and install it from here.
Ouvrez PowerShell et exécutez cette commande :
winget install --id=NitrokeyGmbH.Nitropy -eFermez PowerShell et relancez-le.
You can find information about our package here.
Problèmes connus
La prise en charge de Nitrokey Start sous Windows 10 ne fonctionne pas sans l’installation des bibliothèques libusb (à décrire)
Le programme d’installation ne supprime pas une installation précédente (supprimez-la manuellement en utilisant les paramètres -> ; programmes et applications)