Instalación de nitropy en Windows
Nota
En general, el soporte de Windows y el instalador son experimentales - por favor, utilícelos con precaución.
Nota
Si ya utiliza Python en su sistema y está familiarizado con el símbolo del sistema, puede instalar nitropy con pipx, véase Instalación de nitropy con pipx.
Using our Release
Descargue el último archivo
.exede releases.Abra la consola de comandos en el modo de administrador (Windows 10: pulse el botón derecho del ratón en el menú Inicio y seleccione «Windows PowerShell (Admin)» en el menú).
Change to the directory of the
.exe(something likecd C:\Users\YOURUSER\Downloads)Ejecuta
nitropy-VERSION.exe
Nota
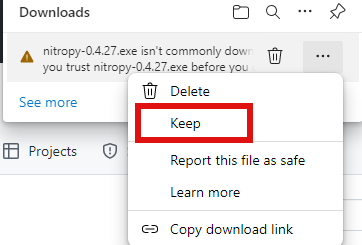
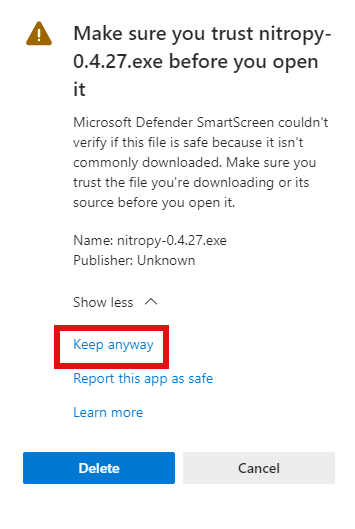
If you’re using Microsoft Edge, the downloaded
.exemight be marked as «untrusted» by Windows. To mark it as trusted anyway, click the three dot on the right of the warning, then «keep», then «show more» and finally «keep anyway».
Nota
Sin privilegios de administrador, nitropy podría no ser capaz de comunicarse con el dispositivo.
Using WinGet
If you don’t have WinGet installed on your system you can download and install it from here.
Abra PowerShell y ejecute este comando:
winget install --id=NitrokeyGmbH.Nitropy -eCierre PowerShell y vuelva a iniciarlo.
You can find information about our package here.
Problemas conocidos
La compatibilidad con Nitrokey Start en Windows 10 no funciona sin instalar las bibliotecas libusb (por describir)
El instalador no elimina una instalación anterior (elimínela manualmente mediante ajustes -> programas y aplicaciones)