Nitropy diegimas „Windows“ sistemoje
Pastaba
Paprastai „Windows“ palaikymas ir diegimo programa yra eksperimentiniai - naudokite atsargiai.
Pastaba
Jei savo sistemoje jau naudojate Python ir esate susipažinę su komandine eilute, galite įdiegti nitropy su pipx, žr. Nitropy diegimas naudojant pipx.
Using our Release
Atsisiųskite naujausią
.exefailą iš išleidimo.Atidarykite komandų konsolę administratoriaus režimu (Windows 10: paspauskite dešinįjį pelės klavišą meniu Pradėti ir meniu pasirinkite „Windows PowerShell (Admin)“).
Change to the directory of the
.exe(something likecd C:\Users\YOURUSER\Downloads)Vykdyti
nitropy-VERSION.exe
Pastaba
If you’re using Microsoft Edge, the downloaded
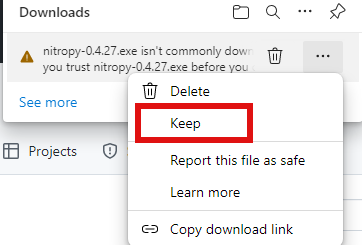
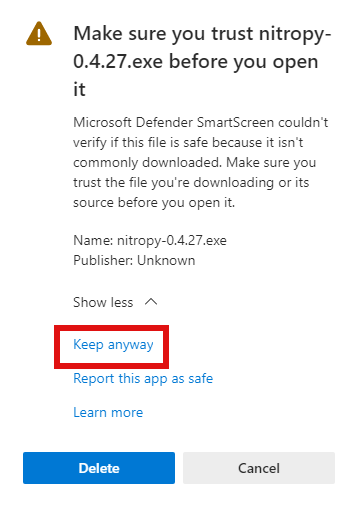
.exemight be marked as „untrusted“ by Windows. To mark it as trusted anyway, click the three dot on the right of the warning, then „keep“, then „show more“ and finally „keep anyway“.
Pastaba
Neturint administratoriaus privilegijų, „nitropy“ gali nepavykti susisiekti su įrenginiu.
Using WinGet
If you don’t have WinGet installed on your system you can download and install it from here.
Atidarykite „PowerShell“ ir paleiskite šią komandą:
winget install --id=NitrokeyGmbH.Nitropy -eUždarykite „PowerShell“ ir vėl ją paleiskite.
You can find information about our package here.
Žinomos problemos
„Nitrokey Start“ palaikymas sistemoje „Windows 10“ neveikia neįdiegus libusb bibliotekų (bus aprašyta)
Diegimo programa nepašalina ankstesnio diegimo (pašalinkite jį rankiniu būdu naudodami nustatymus -> Programos ir programos).