Windows Login With PIV Smartcard Authentication#
This document explains how to provision the PIV function of a Nitrokey 3 for Windows smartcard logon manually with a key and a certificate.
In the future, this manual provisioning may be automated through a Windows MiniDriver.
Aviso
The PIV function of the Nitrokey 3 is currently considered unstable and is not available on the stable firmware releases. To obtain that functionality it is required to install a test firmware. Subsequent firmware updates may lead to loss of data and cryptographic keys. Please refer to the firmware update documentation for more information.
Pré-requisitos#
A Windows server with:
Active Directory (instructions)
A certificate authority (CA), with a certificate template for logon authentication using RSA 2048 bit keys:
Certificate Authority (instructions)
Authentication template (instructions)
A Windows user machine joined to the domain of the server
A Nitrokey 3 with PIV
A Linux system with pivy and PCSCD installed (
sudo apt install pcscd), to provision the Nitrokey (step 1, 2 and 4). Instead of a separate Linux system you can install WSL on Windows. Note that you need to virtually attach the Nitrokey to WSL and start PCSCD (sudo service start pcscd) before using pivy.
1: Generate a key on the Nitrokey#
The key is generated in slot 9A (authentication).
pivy-tool -a rsa2048 generate 9A
Nota
If the administration key is not the default one, it can be specified with -A 3des -K 010203040506070801020304050607080102030405060708 . The argument to -A can also be aes256, and the argument to -K is the key in hexadecimal.
The user PIN can also be specified with -P 123456, or -P <value> if it is not the default. If -P is not provided, it will be asked for after key generation.
This applies to all pivy-tool commands.
This step can take a couple of minutes for RSA keys, as the pure software implementation is slow.
Expected output:
ssh-rsa AAAAB3NzaC1yc2EAAAADAQABAAABAQDKO5ENwrK3qKBAgDkyq1tfiw5JxnoCEIiM3Vc+8Eylux04r1sgjHEyqbOvpScObZuchxFZZ5LdeHynvFn3c07K4HpoZ/7NjLzUYOmlVAy4wpEwRs9psbrT6wbvHVLyffZiiSPW15HHQKcUZZ30WDunh5m7xzvY9ej810QIW/P724MFWTbRdpqmG8m1qWCUM5dqkmpiprI/WeD+VmTcQWbJJ+oyoPyxmwzGyAotl7mVC6EYdcfvyBSNQdVdGfYGxjNEec4aWxoFRg4ADfpPnYD+gLxHcj/9s7o/wdMhXRiSio1tjsEjaeuOICGLaiiLGMfLxpfEApb8qJgsEFgYl6kn PIV_slot_9A@9E424375A38449E59B3DF89D9B90E601
2: Generate a Certificate Signing Request (CSR)#
This step generates a certificate for the key in the authentication slot. pivy-tool -n 'Nitro Test' -u "nitro@test.nitrokey.com" -T user-auth req-cert 9A
The Nitro Test username and the nitro@test.nitrokey.com email address must be changed to own values.
Expected output:
-----BEGIN CERTIFICATE REQUEST-----
MIIC4DCCAcgCAQEwFTETMBEGA1UEAwwKTml0cm8gVGVzdDCCASIwDQYJKoZIhvcN
AQEBBQADggEPADCCAQoCggEBAMo7kQ3CsreooECAOTKrW1+LDknGegIQiIzdVz7w
TKW7HTivWyCMcTKps6+lJw5tm5yHEVlnkt14fKe8WfdzTsrgemhn/s2MvNRg6aVU
DLjCkTBGz2mxutPrBu8dUvJ99mKJI9bXkcdApxRlnfRYO6eHmbvHO9j16PzXRAhb
8/vbgwVZNtF2mqYbybWpYJQzl2qSamKmsj9Z4P5WZNxBZskn6jKg/LGbDMbICi2X
uZULoRh1x+/IFI1B1V0Z9gbGM0R5zhpbGgVGDgAN+k+dgP6AvEdyP/2zuj/B0yFd
GJKKjW2OwSNp644gIYtqKIsYx8vGl8QClvyomCwQWBiXqScCAwEAAaCBhTCBggYJ
KoZIhvcNAQkOMXUwczAMBgNVHRMBAf8EAjAAMA4GA1UdDwEB/wQEAwIGwDAfBgNV
HSUEGDAWBggrBgEFBQcDAgYKKwYBBAGCNxQCAjAyBgNVHREEKzApoCcGCisGAQQB
gjcUAgOgGQwXbml0cm9AdGVzdC5uaXRyb2tleS5jb20wDQYJKoZIhvcNAQELBQAD
ggEBAH6XBlBmc7dQP0mt7uXOyIu8xRSYSfxKBJGjPl0IKDHWke3/4frU5C99/KS/
b9/T4JrlZa/9letjMj8hV4a+pdE0Gpxy+Ac1a9XlMki35UESOXC0JSyirBBLnNtD
qtHKtfPeQ3Csbsj57qjdqBMlWII5cz3jO9EpEG2FgxreJwY5s58KuKit01AJDIWt
GYg9P7MblEEO8iPjcFqccsPTRgU04COT6dOFZ8bGZ18UsnAVMXPOdcR7cppp8mL+
QZCyqdk1m+91rtkJPkqVUK/0o8MJj5k3Ch4ANvQEWnOabRumJaHDu4PmhsqLnQJA
eGQvuPRBmR71GRkGmqu+e1oyze8=
-----END CERTIFICATE REQUEST-----
Copy the certificate signing request to a file request.csr
3: Sign the CSR#
Move the request.csr file from the previous step to the server that hosts the certificate authority. Verify in the certificate template console (certtmpl.msc ) that the template for the users can accept subject names from the request:

Open PowerShell and sign the certificate signing request with certreq.exe -attrib CertificateTemplate:Nitrotest -submit request.csr
This will open a GUI where you can select the correct Certificate Authority if there are multiple on this server. Save the certificate as certificate.crt
4: Store the certificate on the Nitrokey#
cat certificate.der | pivy-tool write-cert 9A
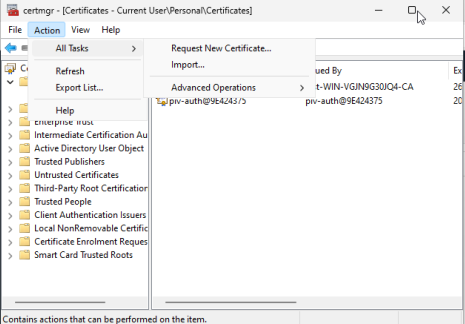
5: Import the certificate to the user account#
Move certificate.der to the user Windows device, and open the certificate manager (For the user, not the machine):

Import the certificate:
Once this is done, log out. Log in with the Nitrokey by using the “sign-in options”