Instalação de nitropia no Windows
Nota
Geralmente o suporte do Windows e o instalador são experimentais - por favor use com cautela.
Nota
Se já utiliza Python no seu sistema e está familiarizado com o prompt de comando, pode, alternativamente, instalar nitropia com pipx, ver :doc:`…/all-platforms/installation”.
Using our Release
Descarregar o último
.exeficheiro de leases.Abra a consola de comando no modo administrador (Windows 10: prima o botão direito do rato no menu Iniciar e seleccione « Windows PowerShell (Admin)» a partir do menu).
Change to the directory of the
.exe(something likecd C:\Users\YOURUSER\Downloads)Executar
nitropy-VERSION.exe``
Nota
If you’re using Microsoft Edge, the downloaded
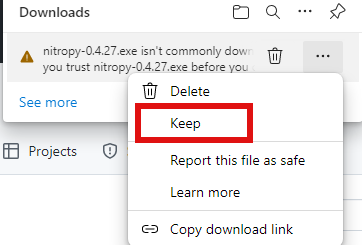
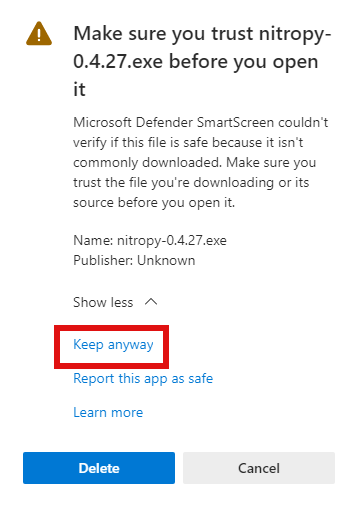
.exemight be marked as «untrusted» by Windows. To mark it as trusted anyway, click the three dot on the right of the warning, then «keep», then «show more» and finally «keep anyway».
Nota
Sem privilégios de administrador a nitropia pode não ser capaz de comunicar com o dispositivo.
Using WinGet
If you don’t have WinGet installed on your system you can download and install it from here.
Abra o PowerShell e execute este comando:
winget install --id=NitrokeyGmbH.Nitropy -eFeche o PowerShell e reinicie-o.
You can find information about our package here.
Questões Conhecidas
O suporte para Nitrokey Start sob Windows 10 não funciona sem a instalação de bibliotecas libusb (a ser descrito)
O instalador não remove uma instalação anterior (remove-a manualmente utilizando definições -> programas e aplicações)