SSH Authentication with FIDO2
Compatible Nitrokeys |
|||||||
|---|---|---|---|---|---|---|---|
✓ active |
✓ active |
⨯ inactive |
⨯ inactive |
✓ active |
⨯ inactive |
⨯ inactive |
⨯ inactive |
SSH (Secure Shell) is a network protocol used to securely access and manage remote systems such as servers or code repositories. It uses cryptographic key pairs for authentication, allowing passwordless logins with strong security.
With a Nitrokey, the private SSH key is generated and stored directly on the device, so it never leaves the hardware. Each login requires you to touch the Nitrokey, adding a simple physical confirmation that protects against unauthorized access. For example, when connecting to a server, GitLab, or GitHub.
Non-Discoverable Credentials
A non-discoverable credential is the default credential type created when the user registers their Nitrokey with an authentication system that supports FIDO2/WebAuthn. The authentication system stores the key handle, while the private key remains securely inside the Nitrokey. This configuration uses no storage space on the Nitrokey and depends on the authentication system to supply the key handle during login. The FIDO2 PIN controls access to the Nitrokey and authorizes all operations involving private keys.
Discoverable Credentials
A discoverable credential is stored directly on the Nitrokey, including all credential information and metadata required for authentication. This allows the credential to be found automatically by the authentication system without providing an external key handle and enables username-less authentication. Discoverable credentials are protected by the FIDO2 PIN, which authorizes their use and ensures that only the authorized user can access them. Each credential typically occupies a few hundred bytes of secure storage. The total number of credentials depends on the Nitrokey model and firmware version, typically between 25 and 100 entries.
Generating SSH Key
Insert the Nitrokey into your computer.
Open a terminal and create your SSH key. Replace
"your_comment"with a label to identify it (e.g., “Nitrokey GitLab”). By default, the key is created as a non-discoverable credential. In this case, a local key handle is stored in ~/.ssh/ while the private key remains on the Nitrokey. This means the key is tied to the system where it was generated, since the local key handle file is required for authentication. Use the -O resident option to create a discoverable credential. In this case, the credential is stored on the Nitrokey, making it portable and usable across different systems without copying any local files.Non-discoverable credential:
ssh-keygen -t ed25519-sk -C "your_comment"Discoverable credential:
ssh-keygen -t ed25519-sk -O resident -C "your_comment"Note
Discoverable credentials can later be listed and imported on another system with:
ssh-keygen -KDuring key generation, you may also be asked to set a passphrase. This passphrase encrypts the local key handle stored in
~/.ssh/(not the private key on the Nitrokey, which always stays securely inside the device). The passphrase is different from the FIDO2 device PIN. The PIN protects the physical key itself, while the passphrase protects your local SSH public key file. We recommend to use a passphrase to protect non-discoverable keys only.When asked for a file path, accept the default option (
~/.ssh/id_ed25519_sk) or choose a custom name likeid_ed25519_sk_gitlab.If the Nitrokey blinks, confirm the operation by touching it.
Eventually the following files will be created. The file names may differ if you specified a custom name when generating the key.
~/.ssh/id_ed25519_sk→ handle to the private key (stored securely on the Nitrokey)~/.ssh/id_ed25519_sk.pub→ public key file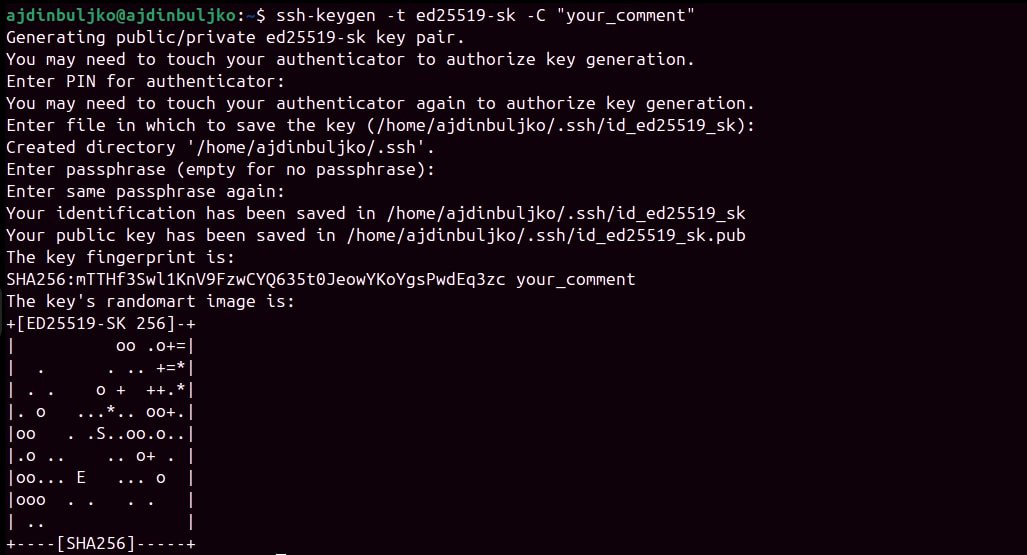
Adding Your Public Key
Once your SSH key pair is generated, the public key must be added to the service or server you want to access.
Display your public key:
cat ~/.ssh/id_ed25519_sk.pubExample output (do not use this key):
sk-ssh-ed25519@openssh.com AAAAGnNrLXNzaC1lZDI1NTE5QG7wZW4zc2guY29tAAAAILeZl6r07HV4i1rK07OfLqD3J4IzX2q0lB6Ok0pdxoG5AAAABHNzaDo= your_comment
Copy the output and add it to your account’s SSH key settings.
See GitLab or GitHub for detailed steps.
To enable SSH remote server access, add your public key to the file
~/.ssh/authorized_keysof your user account on the SSH server.